Cinnamon Rolls – Gluten and Dairy Free

2015-07-19 11.13.12

I have a hard time walking into the shopping mall and resisting the tantalizing aroma of Cinnabon.  I consider breaking down and scarfing down a warm cinnamon roll but I know that a price will have to be paid for such impulsiveness, so I swallow hard and move on.

But now, I have found a recipe that is gluten free and I eat a second and even a third bun with nary a problem.  In fact the whole pan of cinnamon rolls is there for me.  Yum!  This is really a decadent recipe.  Potato starch and corn starch are the flour products used in the recipe so I can’t really justify this one as a “healthy” treat,   But it is the starches that make the product so light and pillowy.  Another plus point for this recipe is that no rising time is required for the yeast dough so that you don’t have to stop in the middle and come back to it.

GLUTEN FREE CINNAMON ROLLS

(Makes 8 or 9 servings)

2 tablespoons shortening or coconut oil

1/4 cup sugar

2/3 cup almond or soy milk (room temperature)

1 packet yeast (about 1 tablespoon)

1 egg

1/4 cup olive oil

1/2 cup potato starch

1 cup corn starch

1/4 teaspoon baking soda

2 1/2 teaspoons xanthan gum

2 teaspoons baking powder

1/2 teaspoon salt

1 teaspoon vanilla extract

1 – 2 tablespoons sugar (to sprinkle on board covered with plastic wrap)

FILLING

1/2 cup packed brown sugar

2 teaspoons cinnamon

3/4 cup chopped nuts (optional)

GLAZE

3/4 cup powdered sugar

1 teaspoon vanilla extract

milk to thin the glaze (soy or almond)

DIRECTIONS FOR CINNAMON ROLLS

Preheat oven to 375 degrees.  Grease a round or oval glass baking dish.

In a medium bowl, combine shortening and sugar.  Mix well.  Measure warm milk and add yeast to milk.  Whisk well to fully dissolve.

Add milk/yeast to sugar mixture.  Add remaining ingredients.  Mix very well with a hand mixer or a stand mixer.  Make sure all lumps are dissolved.  Dough will be quite soft and sticky so the plastic wrap in the next step is essential.

Take a piece of plastic wrap and lay it out so that it covers a 14 x 14 square.  Sprinkle sugar on the wrap.  Lay ball of dough on top and put another sheet of wrap on top.  Pat the dough down a bit and then use a rolling pin to roll into a square of about 13 x 13 inches.

Remove top piece of wrap.  Combine filling ingredients and spread evenly across dough’s surface.  Leave about a 1 inch sugar free border on one side.  (This sugar free area will be the edge to seal the roll.)

Start rolling the dough by lifting the plastic wrap on the sugared edge and begin to roll.  Finish the roll and seal put patting it together.  Now cut your log into into 8 or 9 pieces.  Each one will be about 1 1/2 inches  wide.  Place in the greased glass pan. Bake 20 minutes or until tops are lightly browned.

Combine powdered sugar, vanilla and milk to make glaze.  If you desire a thicker glaze, use a little less milk.  Drizzle over warm rolls.

Pad Thai

File Aug 05, 12 25 29 PM

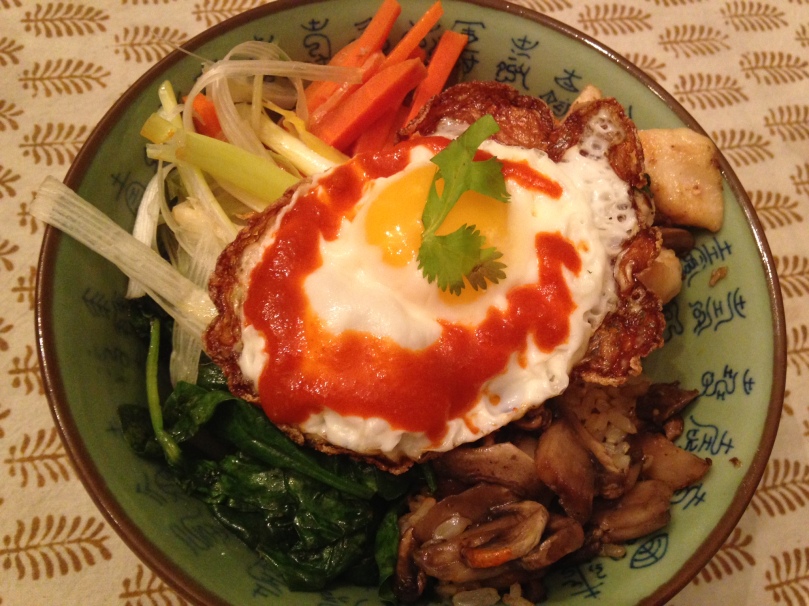
Pictured:  Pad Thai Noodles served with a fried egg and Sriracha sauce.

If you haven’t tried Pad Thai before you will find that it is a nice noodle dish that is absolutely gluten free and by varying the protein with egg or tofu , it can easily be a vegetarian dish as well.  The sauce is peanut butter based so it offers protein already.  Pad Thai is a very pouplar dish from Thailand and vegetables can be varied.  Snow peas, napa cabbage, carrots cut into matchsticks,  mushrooms, bean sprouts and onions all work well in pad thai.

Since we’re cooking gluten free, I’ve found that it is important to read product labels.  Amazingly, most soy sauces contain wheat.  I’ve found that Tamari soy sauce does not contain wheat, yet it doesn’t say gluten free on the label.  Likewise Hoisin Sauce,  a flavorful sauce used a lot in Asian cooking contains wheat as well.  (I guess you could say its like an Asian worcestershire sauce.)  I searched and searched and haven’t found a gluten free version.  But not to despair.  Its easy to make your own from a few ingredients in your pantry.  The proportions of the ingredients don’t have to be exact so after you’ve made it a few times, you can just pour the ingredients into a small bowl to mix it.

Hoisin Sauce Equivalent

2 tablespoons sesame oil

4 tablespoons soy sauce

And, add any of the following:

2 tablespoons peanut butter

1 tablespoon molasses or brown sugar

Black Pepper

Hot Sauce as desired (Tabasco or Texas Pete works well)

Mix and set aside.
Pad Thai

8 ounces dried rice stick noodles, medium or wide width

1/3 cup creamy or chunky peanut butter

1/4 cup fish sauce

2 tablespoons Hoisin Sauce

2 tablespoons rice vinegar (rice vinegar is a very light vinegar.  If you don’t have this, substitue with 1 tablesppon each of water and vinegar)

2 tablespoons sugar

1 teaspoon chilli paste

2 tablespoons olive oil

4 medium scallions, cut into 1 inch pieces

4 medium garlic cloves, minced

1 pound medium shrimp, peeled and deveined, (or substitue with beef or chicken)

1 1/2 cup been sprouts

1/4 cup cilantro leaves, chopped

Fresh lime wedges
Cover noodles with not water and let it soak for 10 minutes.  Drain and set aside

Whisk peanut butter, fish sauce, hoisin sauce, rice vigegar, sugar, chilli paste together until creamy.  Set aside.  Heat the oil in a large skillet, and add the garlic and your vegetables.  Sitir fry for 1 minute.  If using shrimp add and stir fry until pink.  Otherwise add the cooked chicked or beef.  Pour in the sauce, and then the noodles.  If you find you need more liquid, you can add a vegetable or chicken stock.  I find that I usually need more liquid so I keep it handy.

Cliantro, and bean sprouts which don’t need much cooking can be added after cooking.  Serve with lime wedges on the side.

Note:  This is a basic recipe.  Today I made my pad thai with onions,  matchstick carrots,, green onion and beef.  I added the thinly sliced napa cabbage, cilantro, and more green onion after cooking along with fresh basil.

Dark Chocolate Cupcakes

cupcake

This has become one of my favorite recipes.  The chocolate cupcakes are nice and chocolatey, just the way I like them.  And really, you absolutely cannot tell that it is gluten free.

The recipe is from the book How Can This Be Gluten Free that I have modified to be dairy free.


Dark Chocolate Cupcakes     Makes 12 cupcakes
1/2 cup olive oil

3 ounces bittersweet chocolate, chopped (I use Ghiradelli Chocolate Chips.  I can tolerate a little bit of milk in the chocolate, but if you are extremely sensitive, you may want to use another chocolate)

1/3 cup unsweet cocoa powder

3/4 cup GF Flour Blend

3/4 teaspoon baking powder

1/2 teasppon baking soda

1/2 teaspoon xanthan gum

2 large eggs

1 teaspoon vanilla

3/4 cup sugar

1/2 cup almond milk

Position oven rack to the lower-middle of the oven.  Preheat oven to 350 degrees.  Line a muffin pan with 12 cupcake liners. Microwave the oi, chocolate, and cocoa at 50% power for about 2 minutes.  Stir occasionally.  Whisk the chocolate and set aside.

Whisk together the dry ingredients and set aside.

Whisk together the eggs, vanilla, and sugar.  Whisk in the chocolate and milk, and finally the flour.  Divide the batter between the 12 lined muffin cups.
No Butter Buttercream Frosting

1/2 cup (1 stick) dairy-free margarine (such as lactose free Blue Bonnet Margarine)

2 teaspoos vanilla

3 to 4 cups sifted powdered sugar

1/2 cup unsweetened cocoa powder

2 to 4 tablespoons almond or soy milk
Beat margarine with electric mixer at medium speed until light and fluffy.  Add vanilla.  Gradually beat in powdered sugar and cocoa powder.  Add almond or soy milk by tablespoon until spreadable.